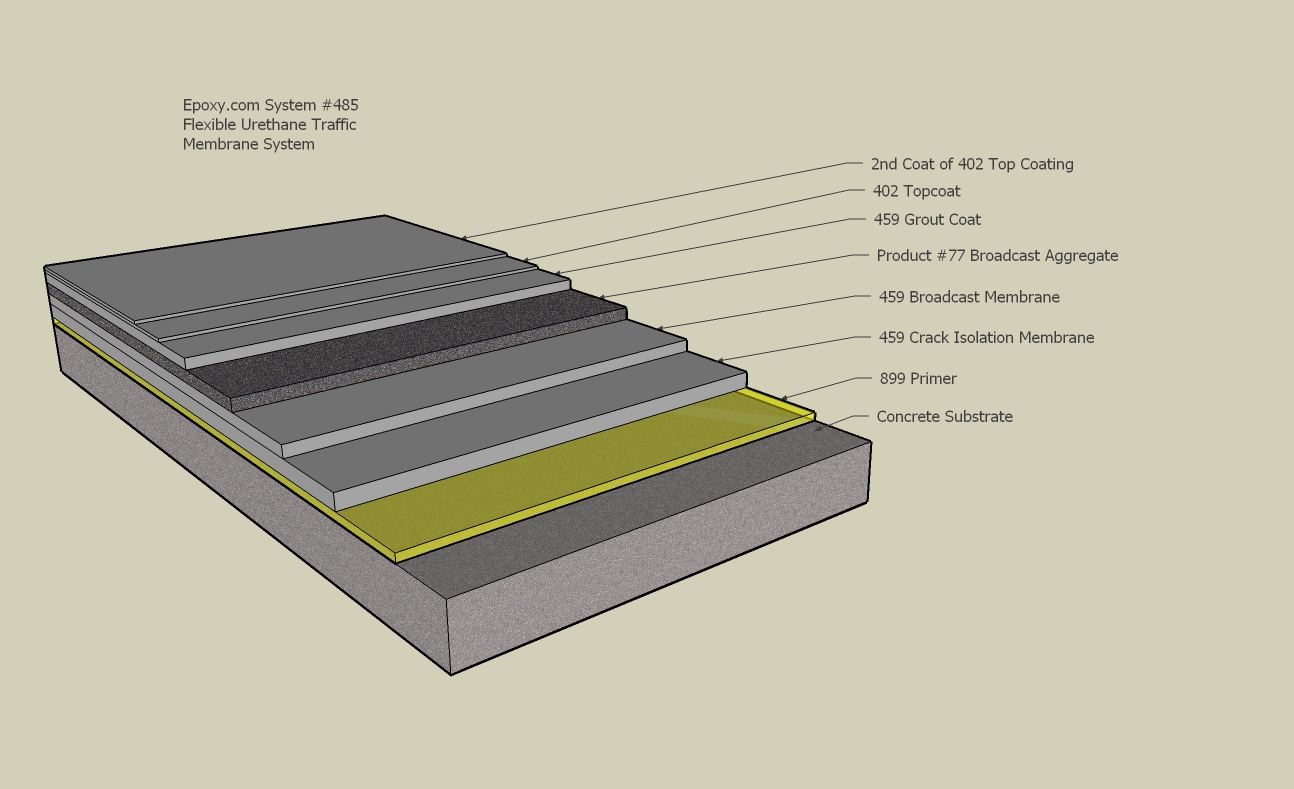
Elastomeric Polyurethane System Description
Epoxy.com System #485 is an Elastomeric Urethane Membrane System, that is
liquid applied. System #485 Elastomeric Membrane System is seamless,
elastomeric (flexible), and UV. These qualities make it an excellent choice
for outside applications in direct sun and weather, where water tightness,
durability, and excellent appearance is required. Its elastomeric properties
will allow horizontal movements up to 1/8 inch without breaking.
Epoxy.com System #485 has excellent abrasion and chemical resistance.
The surface of System #485 can be varied to achieve the required anti-skid
and decorative look.
Surface Preparation
Quality surface preparation is an absolute requirement of a quality
installation. Be sure to follow surface preparation requirements found at
www.epoxy.com/surfaceprep.aspx. This system installs best when it is
about 75 degrees F. The minimum temperature of the slab must be at least 50
degrees F. for proper curing of the material
MATERIAL QUANTITIES
Guideline System Requirements for 1000 ft²
Epoxy.com Elastomeric Decking System
| Step # |
Product |
Coverage |
| 1 |
Epoxy.com Product #899 Primer |
250-300 SF per gallon |
| 2 |
Epoxy.com Product #459 Elastomeric
Membrane |
50 SF per gallon |
| 3 |
Epoxy.com Product #459 Elastomeric
Membrane |
50 SF per gallon |
| 4 |
Epoxy.com Product #77 Broadcast (anti-skid) aggregate
|
0.5 lbs per SF |
| 5 |
Epoxy.com Product #459 Elastomeric
Membrane
|
80 SF per gallon |
| 6 |
Epoxy.com Product #402 |
200-300 SF per gallon |
| 7 |
Epoxy.com Product #402
|
200-300 SF per gallon |
Installation
Priming
All floors should be primed in order to assure
maximum bond. The primer also helps to fill small holes and seal air in the
concrete to prevent off-gassing that may cause bubbles.
1. Before starting be sure to mask all termination points
like doorways, expansion joints etc. Duct tape or other heavy duty masking
materials work better than conventional masking tape.
2. Mix both "A" and "B" sides separately, with a clean
mixer before starting.
3. Remember to mix small batches. If you make a batch
to big you will waste material, as it will set up before you can use it. Mix
2 parts "A" (Resin) with 1 part "B" (Hardener) for 3 minutes using an
Epoxy.com Paddle (5 inch or larger) in a low speed drill.
4. It is recommended that you avoid thinning. If you
must thin, use no more than 10% by Volume of high quality (high purity)
xylene. That amounts to about about 12.8 oz per gallon, maximum.
5. Do not mix more material than you can use in 30
minutes. If the air warmer than 75 degrees F, and/or if your material is
warmer than 75 degrees F. make your batches even smaller. If you make a
batch too small you just have to make another batch. If you make it too
large, you will likely waste material.
Application of Primer
1. Apply by 3/8 nap shed resistant roller or pour primer
onto the concrete and squeegee and back-roll with a short to 3/8 nap shed
resistant roller as necessary. Application rate is 250 square feet per
gallon.
2. Do not allow to run or puddle. Primer is only required
on concrete surfaces. Be sure to remove the masking tape as you go. If you
let the Product #899 Epoxy Primer cure too much first
the tape will be very difficult to impossible to remove.
3. Allow primer to sit for about 6-10 hours, or until the
primer is hard, cool, and ready to walk on. If primer is to be allowed to
set for more than 24 hours before installation of next step, broadcast the
surface with Epoxy.com Product #77 or dry 30 mesh silica sand to
saturation.
Application of Flexible Urethane Crack Isolation
Membrane
Epoxy.com Product #459 Elastomeric Membrane
1. Before starting be sure to mask all termination
points like doorways, expansion joints etc. Duct tape or other heavy
duty masking materials work better than conventional masking tape.
2. Be sure to mix small enough batches, so as not to
waste material. Mix 6.6 Parts A with 1 Part B by volume. Stir for 3-5
minutes with and Epoxy.com Mixing Paddle (minimum 5 inch) in a low speed
drill for 3-5 minutes. Although not recommended, you can add a small amount
of high quality (high purity) xylene to lower the viscosity.
3. Mix only what you can use in 30 minutes at 75 degrees
F. Remember that if your material, air, or substrate temperatures are
higher you will need to make batches that you can use before the usable
potlife at those higher temperatures. Remember if you make a batch too
small you have to make another batch. If you make the batch too big, you
will loose material.
Application
1. Spread Epoxy.com Product #459
Elastomeric Membrane at a rate of 50 square feet per gallon.
2. Carefully back-roll using a short nap roller. Be sure
to remove the masking tape as you go.
3. The Epoxy.com Product #459
Elastomeric Membrane should be allowed to cure for a minimum of 8 to 12
hours. If more than 24 hours or so passes in between this coat and the next
coat, be sure to solvent wipe this coat with xylene before going on to the
steps below.
Application of the Elastomeric Broadcast coat
Epoxy.com Product #459 Elastomeric Membrane
1. Before starting be sure to re-mask all termination
points like doorways, expansion joints etc. Duct tape or other heavy
duty masking materials work better than conventional masking tape.
2. Mix small batches to prevent waste. Mix 6.6 Parts A
with 1 Part B by volume. Stir for 3-5 minutes with and Epoxy.com Mixing
Paddle (minimum 5 inch) in a low speed drill for 3-5 minutes. Although not
recommended, you can add a small amount of high quality (high purity) xylene
to lower the viscosity.
3. Mix only what you can use in 30 minutes at 75 degrees
F. Remember that if your material, air, or substrate temperatures are
higher you will need to make batches that you can use before the usable
potlife at those higher temperatures. Remember if you make a batch too
small you have to make another batch. If you make the batch too big, you
will loose material.
Application
1. Spread Epoxy.com Product #459
Elastomeric Membrane at a rate of 50 square feet per gallon.
2. Carefully back-roll using a short nap roller. It is
important that the material must be applied evenly. Thicker areas of resin
will create high spots, thinner areas of resin will create low spots.
Uneven distribution of the resin thickness at this stage will be
exacerbated by the sand broadcast below which will make the thicker areas
even thicker. So be sure your Epoxy.com Product #459
Elastomeric Membrane is applied evenly
3. Allow to level for 10 to 15 minutes.
4. Apply Epoxy.com Product #77 (30 mesh silica) Broadcast
sand into the wet surface of the Epoxy.com Product #459
Elastomeric Membrane until the surface appears dry. Broadcast by throwing
the Product #77 into the air and letting in drop into the surface below.
Avoid clumping up the sand, by throwing it directly at the surface and
creating high spots. If you you cannot broadcast far enough onto the
Product #459 without walking on the wet material, be sure to put on spiked
shoes first. Never walk in wet material without spiked shoes.
Many installers find it works better to broadcast as they go, to prevent
having to walk in the wet material with spiked shoes. Remove your masking
tape after as you go, after you broadcast your sand.
5. The Epoxy.com Product #459
Elastomeric Membrane should be allowed to cure for a minimum of 12 to 16
hours. Sweep off the excess Product #77 the next day. Sand lightly or use a
rubbing stone. Vacuum to remove all the loose sand. The better you vacuum
it, the more even the appearance usually is.
Grouting with the Elastomeric Urethane Membrane
This step should be done after all of all of the
work above has been done over the entire floor.
Epoxy.com Product #459 Elastomeric Membrane
1. Before starting be sure to mask all termination
points like doorways, expansion joints etc. Duct tape or other heavy
duty masking materials work better than conventional masking tape.
2. Mix small batches to prevent waste. Mix 6.6 Parts A
with 1 Part B by volume. Stir for 3-5 minutes with and Epoxy.com Mixing
Paddle (minimum 5 inch) in a low speed drill for 3-5 minutes. Although not
recommended, you can add a small amount of high quality (high purity) xylene
to lower the viscosity.
3. Mix only what you can use in 30 minutes at 75 degrees
F. Remember that if your material, air, or substrate temperatures are
higher you will need to make batches that you can use before the usable
potlife at those higher temperatures. Remember if you make a batch too
small you have to make another batch. If you make the batch too big, you
will loose material.
Application
1. Spread Epoxy.com Product #459
Elastomeric Membrane at a rate of 80-100 square feet per gallon, depending
on how anti-skid you want the final surface to be.
2. Carefully back-roll using a short nap roller. It is
important that the material must be applied evenly. Thicker areas of resin
will create high spots, thinner areas of resin will create low spots.
Uneven distribution of the resin thickness at this stage will be
exacerbated by the sand broadcast below which will make the thicker areas
even thicker. So be sure your Epoxy.com Product #459
Elastomeric Membrane is applied evenly. Remember to remove your masking
tape as you go.
3. Allow cure for 8-12 hour before installing the
top-coating. If the material sets for more than 24-48 hours be sure to sand
and solvent wipe before installing the top-coating Epoxy.com
Product #402 Top-Coating.
Sealing with the Elastomeric Aliphatic Urethane
Topcoat
1. Before starting be sure to mask all termination points
like doorways, expansion joints etc. Duct tape or other heavy duty masking
materials work better than conventional masking tape.
2. Mix both "A" and "B" sides separately, with a clean
mixer before starting.
3. Be sure to mix small batches to prevent waste. Mix
two (2) Parts "A" (Resin) with 1 Part "B" Hardener by volume. Stir for 3
minutes using an Epoxy.com Mixing Paddle in a low speed drill. Thinner or
Accelerator may be used as jobsite requires. Contact Epoxy.com Technical
Support at 714-657-3826 for more information.
4. Mix only what can be used in 15 minutes at 75 degrees
F. Higher temperatures require you to mix even smaller batches as your 30-40
minute potlife will decrease in time as the temperature increases.
Applying The Epoxy.com Product #402 Aliphatic Urethane Top-Coat.
1. This material can be applied by a short nap to 3/8
inch roller. Alternately you can pour the product in a line on the floor,
spread with a squeegee and then back roll with a short nap roller. Be sure
to leave an even texture. Remember that if you will apply by roller that you
will want to make be sure your batch is very small (never more than you can
use in 15 minutes or less at 75 degrees F.) Remember that it is warmer than
75 degrees F. you will want to make batches that you can use even sooner. Be
sure to remove the masking tape as you go.
2. Allow to cure.
3. Repeat the "Sealing with the Aliphatic Top-Coating"
section for a second coat.
4. Full cure takes 5 days. This 5 day cure will give
you the maximum abrasion and chemical resistance. You can typically
however, open to light foot traffic in 25 hours at 75 degrees. F.
Remember when in doubt contact Epoxy.com Technical Support.